This week has seen Harper's BAZAAR Style Network celebrate Australia Day by focusing on Australian Designers - with the girls donning some gorgeous outfits by local Aussie designers. I decided to go a little bit abstract on the Australian theme and do a project that would be perfect to wear that quintessentially Australian festivity - the good old BBQ. This sequin bra would be perfect worn under a sheer white singlet or tee paired with denim cut offs and gladiator flats, and from it I get a bit of an Ellery or Sass & Bide vibe.
Showing posts with label Underwear. Show all posts
Saturday, January 28, 2012
Wednesday, November 9, 2011
DIY ON THE RUNWAY - VICTORIA SECRET 2011 RUNWAY SHOW

Putting aside the out-of-this-world bodies for a minute - lets focus on the amazing DIY inspiration that sailed down Victoria Secret the runway last night. Gahhhhh! Whoever makes the costumes is incredibly talented and deserves a medal for their DIY skills and ability to see sexy potential in every outfit. The floral bow embellished shoulders took the cake for me, along with the studded wings, a maxi skirt made out of a patchwork blanket, peacock feather skirt, leopard print wrapped top, and rainbow crochet bell sleeved number. The hotties have inspired me to take my crafting to another level!
Images: TFS
Labels:
Floral,
Inspiration,
Runway,
Studs,
Underwear
Tuesday, October 11, 2011
DIY ON THE RUNWAY - FISHTAIL SKIRTS AT JASON WU SS12
Fishtail or 'high-low' skirts have been cropping up everywhere recently, and what's not to love about this sexy take on the maxi/midi skirt? A number of different ' mini at the front, maxi at the back' styles came down the runway at the recent Jason Wu SS12 show, and they struck me as being extremely easy to make. These images were the inspiration behind a DIYproject that I'll be showing you later on this week, so stay tuned.
How amazing is the poofy tiered pink skirt that looks like a wedding cake?
Images: Style.com
Thursday, October 6, 2011
D I Y STREETSTYLE - #PFW
Fashion weeks sooo remind me of that movie Night At The Roxbury where Doug and Steve think that it would be better to have the outside of the nightclub on the inside and the inside on the outside. In the case of fashion week clearly what goes on outside the shows is just as important as what goes on inside on the catwalk. Very happy to see that there was DIY inspiration aplenty at the recent Paris Fashion Week!
Wrap your beanie with mesh lace for a Jil Sander inspired winter look.
Deconstruct a few shirts - sew the front of a khaki shirt onto the sides of a pattered shirt.

Cut rectangles out of a mini white dress
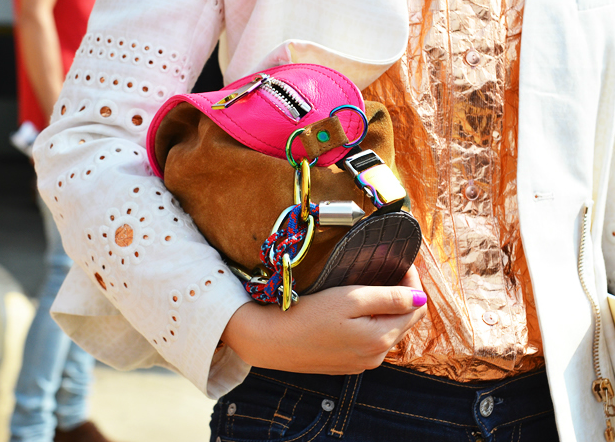
Swap the handle of your bag for some knotted neon climbing rope and linked up carabiners.
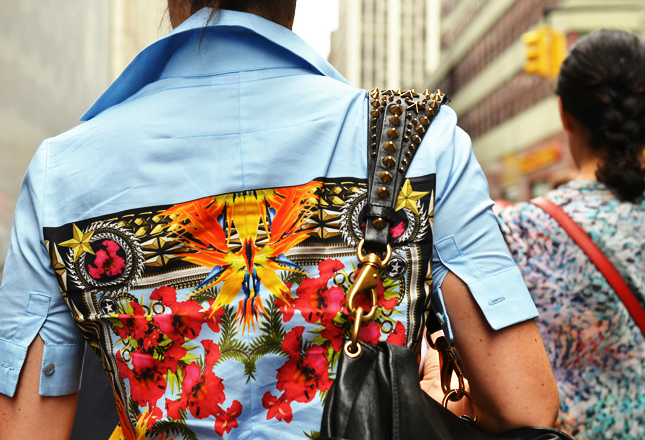
Cover a clutch in yellow fringe. Stud the shoulder strap of a handbag. |
Labels:
Bags,
Dresses,
Fashion Week,
Inspiration,
Jackets,
Paris Fashion Week,
Shirts,
Skirts,
Streetstyle,
Underwear
Monday, September 19, 2011
DIY ON THE RUNWAY - PRABAL GURUNG SS12
Practically dripping with DIY inspiration. Amazing rope necklines, graphic shaped cut outs, violet dip dye, net skirts and corset body belts were all over the SS12 RWT Prabal Garung runway. Now, what am I going to make first?
Backstage images are so much more satisfying to me than the traditional runway images, don't you think? Images via Garbage Dress
Labels:
Belts,
Dresses,
Fashion Week,
Inspiration,
Jackets,
New York Fashion Week,
Rope,
Runway,
Skirts,
Underwear
Thursday, September 15, 2011
DIY STREETSTYLE | #NYFW
What better place to find DIY inspiration than on the streets of New York Fashion week? Here are some of my key picks. *one of which I am currently making!
Create a maxi dress with a wide side split by attaching fabric to a mini skirt or dress.
Create some yummy fabric pom poms.
Spraypaint some jeans. Use cardboard to overlap various colours and create geometric shapes.
Create a sleeveless dress using an oversized thrifted blazer. Stack collar necklaces on top.
Wrap a silk scarf for an arm party update.
Head down to a hardware store for supplies to make a steel mesh bag.
A complete NYFW rundown to come soon - stick around for my take on the best DIY inspirations for SS12.
Images: Tommy Ton for Style.com, Phil Oh for Vogue.com, Streetfsn
Monday, August 29, 2011
DIY [MIRANDA KERR] & MICHAEL KORS INSPIRED CUT OUT DRESS - kora organics guest post
I recently had the pleasure of doing a guest DIY post for the Miranda Kerr KORA Organics website. If you haven't checked it out already make sure you do - it's overflowing with lifestyle advice on beauty, fashion, nutrition and exercise. It also has a section on natural therapies which I am all for so check it out. Random fun fact? Miranda went to the same high school as me in Brisbane for a couple of years (she was a few grades above), and according to one of my first-year university boyfriends, the thought that I could have sat in a chair that she had also sat on in a previous class made me wayyy way wayyy more attractive.
For the DIY, Brooke of The Style Net and I decided that I would recreate this absolutely gorgeous Michael Kors cut out gown Miranda wore to the CDFA awards this year.
(yup, lookin bangin)
As soon as I saw it I knew it was a look I was going to have to try to recreate using my DIY skills. The rib cut outs and front split lent itself perfectly to the re-fashioning of a basic black maxi dress.
You'll need:
A basic black maxi/midi dress in a jersey fabric (I bought mine from a cheap store for less than $10)
Scissors
Chalk
A needle and black thread
How to:
1. Put the dress on and mark where the two round cut outs should go using chalk. A circle about the size of a saucer sitting centred on each of the side seams at the height of your ribs is best. Note that while the Michael Kors dress has a cut out that goes all the way around the back - the one I made was just cut out on the sides and is intact at the back.
2. Cut the circles out.
3. Hem the circles using small stitches
4. One you have hemmed the but outs, pull the circles together in the front to create a gathered and a more triangular shaped cut out. I found this style suited me more and worked better with this soft jersey fabric.
5. For the split, put on the dress and mark where you want the front side split to stop. Cut from the hem to the marked point. Because of the type of jersey the dress I used was made out of I didn't have to sew the edges of the split but you may want to.
Voila! All done. Now all you have to do is pair it with your favorite gold jewellery and highest of heels and hit the town.
Labels:
A Pair and A Spare DIYs,
Cut out,
DIY,
Dresses,
Fashion Week,
Jackets,
lab,
Maxi,
Maxi Dresses,
Skirts,
Underwear
Thursday, April 14, 2011
DIY Side Split Wrapped Bodice Dress - The Tutorial
Thanks for all your lovely feedback on my DIY side split dress. This is the tutorial a lot of you have been asking for - the side split dress with wrapped bodice. It's so incredibly easy.
UPDATE: NOTE THAT SINCE I PUBLISHED THIS POST I HAVE POSTED A VIDEO TUTORIAL HERE ON A SIMILAR STYLE DRESS.
The first thing to do is to make a maxi skirt using the tutorial I gave here. Create the split by only sewing the top 30cm (or so) of the long seam together. To make the bodice you will need around 2m of fabric - preferably silk, with a width of between 50cm and 1m. In this tutorial I have a crop top on (admittedly not very sexy at all) but when you make yours you won't be wearing a top of any sort underneath.
Here goes!
For those of you concerned about bursting out of the dress, if you wrap tightly enough and stitch down properly you should be able to do a whole night of dancing without any trouble. Women in South East Asia have been wearing saris for thousands of years using techniques like this so I promise you'll be fine. Be sure to have a pair of scissors on your bedside table for when you get home - and cut the stitched thread and not the fabric.
I've made another one for the wedding I am going to but I still can't decide which to wear. I'll be adding a few little extra details on the day which I can't wait to show you. Do you know what the best thing is about this dress? Once you've finished wearing it you can unwrap the fabric and use it for something else. You can even unpick the maxi skirt and use that too! That's what I'll be doing once I have worn these dresses... Talk about recession chic.
UPDATE: NOTE THAT SINCE I PUBLISHED THIS POST I HAVE POSTED A VIDEO TUTORIAL HERE ON A SIMILAR STYLE DRESS.
The first thing to do is to make a maxi skirt using the tutorial I gave here. Create the split by only sewing the top 30cm (or so) of the long seam together. To make the bodice you will need around 2m of fabric - preferably silk, with a width of between 50cm and 1m. In this tutorial I have a crop top on (admittedly not very sexy at all) but when you make yours you won't be wearing a top of any sort underneath.
Here goes!
1. Place the strip of fabric over your shoulder.
2. Tuck one end of the fabric into the maxi skirt.
3.Twist and tighten the fabric over your shoulder, making sure to cover your breast properly.
4. Still twisting, bring the fabric around behind your back.
5. Bring the fabric across the front covering your other breast.
6. Bring the fabric around tightly behind your back again.
7. Keep wrapping tightly until you have run out of fabric. When this happens tuck the end into the wrapped fabric and stitch down.
You're done!
This is the dress without the crop top on - I have done it a bit tidier here too.
It may take you a few tries to get the wrapping and gathering exactly as you like it - but just play around with it until it suits your style and your frame. Make sure you cover the top of the waistband of the skirt with the wrapped fabric for a more streamlined look - you can stitch these together if you want but I didn't bother. You can even throw a belt or sash around the waist too. How nice is the side view and the back with the twisted fabric? For those of you concerned about bursting out of the dress, if you wrap tightly enough and stitch down properly you should be able to do a whole night of dancing without any trouble. Women in South East Asia have been wearing saris for thousands of years using techniques like this so I promise you'll be fine. Be sure to have a pair of scissors on your bedside table for when you get home - and cut the stitched thread and not the fabric.
I've made another one for the wedding I am going to but I still can't decide which to wear. I'll be adding a few little extra details on the day which I can't wait to show you. Do you know what the best thing is about this dress? Once you've finished wearing it you can unwrap the fabric and use it for something else. You can even unpick the maxi skirt and use that too! That's what I'll be doing once I have worn these dresses... Talk about recession chic.
Labels:
A Pair and A Spare DIYs,
DIY,
Dresses,
Fashion Week,
Jackets,
lab,
Maxi,
Maxi Dresses,
Outfits,
Skirts,
Underwear
Subscribe to:
Posts (Atom)